 Hey! I'm Jess Szmajda.
Currently VP, One Pipeline, at Capital One. Formerly GM at AWS; former CTO at
Hey! I'm Jess Szmajda.
Currently VP, One Pipeline, at Capital One. Formerly GM at AWS; former CTO at Minecraft Mod with RubyBukkit
The other day I went to CoderDojoDC and it seemed like every kid there was obsessed with Minecraft. I recently interviewed Charles Nutter, who mentioned you could mod Minecraft with JRuby. I wanted to get some experience with it so I could help the kids out, so I figured I’d give it a shot. It wasn’t hard!
I did this with Ubuntu linux. YMMV with other OS’s, but it shouldn’t be that much different.
Gather your forces
You have to have a few things installed to begin writing your mod:
- First off, you need Minecraft itself.
- Download RubyBukkit from their downloads page (I used version 0.8)
- Go to JRuby’s downloads page and download the “Complete .jar” (I used 1.7.2)
- Follow the “Get CraftBukkit” instructions. At the time I’m
writing this, I needed to get the beta build to be compatible with the
version of Minecraft the client was running, so if you see an error
connecting to the server, try that, just replace
craftbukkit.jarin the instructions with the beta one.
At this point you should be able to start the craftbukkit server and you’ll see some output like:
23:04:48 [INFO] Starting minecraft server version 1.4.7
23:04:48 [INFO] Loading properties
23:04:48 [INFO] Default game type: SURVIVAL
23:04:48 [INFO] Generating keypair
(etc)
RubyBukkit
Now you need to set up RubyBukkit. Move the .jar file you downloaded
from RubyBukkit’s website (RubyBukkit.jar) into the plugins folder in
the minecraft server’s main folder. In there, create a folder called
RubyBukkit, and in that folder put your JRuby .jar file and name it
jruby.jar. In the end you should have something like this:
$ find plugins/
plugins/
plugins/RubyBukkit.jar
plugins/RubyBukkit
plugins/RubyBukkit/jruby.jar
This time when you start the craftbukkit server you should see (among lots of other text):
23:12:52 [INFO] [RubyBukkit] Loading RubyBukkit v0.8
23:12:52 [INFO] [RubyBukkit] Enabling RubyBukkit v0.8
23:12:52 [INFO] [RubyBukkit] Ruby version set to 1.8
23:12:52 [INFO] [RubyBukkit] Using JRuby runtime plugins/RubyBukkit/jruby.jar
23:12:52 [INFO] [RubyBukkit] Loading Ruby plugins...
If you see that, you’re ready to program! If not, RubyBukkit is pretty helpful, so look at its error messages. If there’s nothing from RubyBukkit at all, maybe you didn’t install it correctly.
Plugins
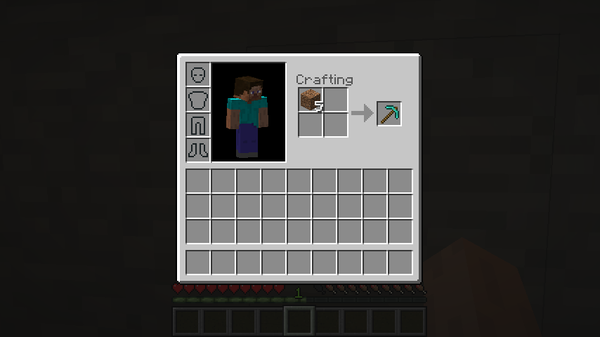
As my minecraft server was playing with a brand new world, I didn’t have a home or even very good tools. I did have some dirt, though, so I wrote this plugin:
Plugin.is {
  name "AwesomeDirt"
  version "0.2"
  author "Jess"
}

import 'org.bukkit.Material'
import 'org.bukkit.inventory.ItemStack'
import 'org.bukkit.inventory.ShapelessRecipe'

class AwesomeDirt < RubyPlugin
  def onEnable
    result = ItemStack.new(Material::DIAMOND_PICKAXE, 1)
    recipe = ShapelessRecipe.new(result)
    recipe.addIngredient(1, Material::DIRT)
    getServer.addRecipe( recipe )
  end
end
You can see the plugin system is event driven, so onEnable in my
AwesomeDirt class is called when the plugin is enabled (or loaded).
All I do here is construct a new shapeless recipe (this recipe only
cares that the ingredients are in the craft window, not where in the
window) that requires one clod of dirt and spits out one diamond
pickaxe. After adding that recipe to the server, I now have some pretty
awesome dirt!
To get it to work, I saved that code into a file called
awesome_dirt.rb and placed it in the RubyBukkit folder in the plugins
folder, so plugins/RubyBukkit/awesome_dirt.rb
Digging holes
Of course, even diamond pickaxes aren’t fast enough sometimes, so I
modified my code to add the /dig command:
Plugin.is {
name "AwesomeDirt"
version "0.2"
author "Jess"
commands :dig => {
:description => "digs a tunnel",
:usage => "/dig"
}
}
import 'org.bukkit.Material'
import 'org.bukkit.inventory.ItemStack'
import 'org.bukkit.inventory.ShapelessRecipe'
class AwesomeDirt < RubyPlugin
def onEnable
result = ItemStack.new(Material::DIAMOND_PICKAXE, 1)
recipe = ShapelessRecipe.new(result)
recipe.addIngredient(1, Material::DIRT)
getServer.addRecipe( recipe )
end
def onCommand(sender, command, label, args)
case command.name
when 'dig'
# Sender is the player who ran the command
loc = sender.location
dig(loc)
end
true
end
def dig(loc)
# Yaw is the easiest way to get a 2d-coordinate player facing
dir = (loc.yaw / 90.0).round.abs
# map it into this array for easier comprehension
direction_facing = [:south, :west, :north, :east, :south][dir]
world = loc.world
size = 3
size.times do |delta_y| # 0, 1, 2
size.times do |delta_left_right|
delta_a = delta_left_right - 1 # -1, 0, 1
size.times do |delta_front|
delta_b = delta_front + 1 # 1, 2, 3
floored_x = loc.x.floor
floored_z = loc.z.floor
block_y = loc.y.floor + delta_y
# which blocks we pick are dependent on which way we're looking
block_x, block_z = case direction_facing
when :north
[ delta_a + floored_x, (floored_z - delta_b) ]
when :south
[ delta_a + floored_x, (floored_z + delta_b) ]
when :east
[ (floored_x - delta_b), delta_a + floored_z ]
when :west
[ (floored_x + delta_b), delta_a + floored_z ]
end
block = world.getBlockAt(block_x, block_y, block_z)
# 0 is Air. See http://www.minecraftwiki.net/wiki/Data_values
block.setTypeId( 0 )
end
end
end
end
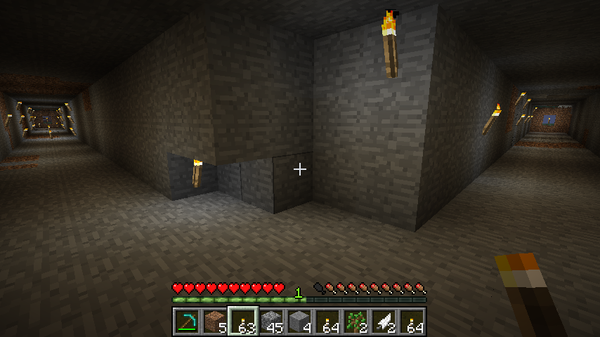
endIt’s not super pretty, but now when I issue the ‘/dig’ command in minecraft (just type /dig into the client when connected to your server), a 3x3 grid of blocks directly in front of me will turn into air (disappear). Makes building tunnels a snap!
You can see the onCommand callback is called for the /dig command.
Useful stuff
In the craftbukkit server console, you can run the reload command to
reload your plugin. This way I was able to get a nice quick dev/test
loop (write some code, save the file, reload in the server, test it in
the client, repeat).
In the client itself, you can hit F3 to get some debug info including things like where you are, the direction you’re facing, and all kinds of other stuff. Invaluable for a plugin developer!
Getting some debug output from your own plugin isn’t too bad, you can
either use sender.sendMessage("some string") to print stuff on the
client or just puts to see stuff written out to the craftbukkit server
console. Not magic but effective.
Last thoughts
Doing math in a coordinate system is probably beyond most of these kids right now, but adding recipes will probably be pretty simple, and I imagine there are a number of other relatively easy things we could try, too.
I’m mostly very impressed by how simple it was to get going with this. Kudos to the Bukkit team for their great infrastructure, and to RubyBukkit for making it possible with JRuby!
Update: Evan Light mentioned that using Purugin makes this all even easier. Give it a shot!