 Hey! I'm Jess Szmajda.
Currently VP, One Pipeline, at Capital One. Formerly GM at AWS; former CTO at
Hey! I'm Jess Szmajda.
Currently VP, One Pipeline, at Capital One. Formerly GM at AWS; former CTO at How I Claude Code
I sing in a choir! I also have a fairly wide range, and sufficient vanity that I like to hear myself sing, so I had an idea for an app where I could record myself singing all four parts of the songs we’re performing, mainly for my own amusement. Silly perhaps, but with Claude Code these days, very approachable.
I also wanted to have a relatively simple project to showcase the development process I’ve been using with Claude Code.
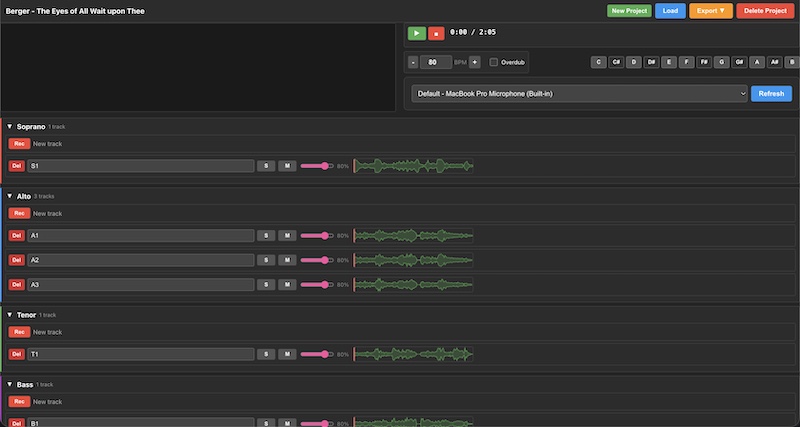
The result is a browser-based multi-track audio recorder called SATB (Soprano, Alto, Tenor, Bass) that lets me record myself singing all four voice parts, overdub multiple takes, mix them with individual track controls, and export the final harmony to WAV or MP3. The entire app runs locally in the browser using the Web Audio API - no server required. It’s backed by 685 passing tests, all written using test-driven development with Claude Code, and it took me just about 8-10 hours of paying attention to Claude to build it.
But the app itself isn’t the point of this post - it’s how we built it together.
I’ve been working on building a side project (Threadkeeper - AI-powered journaling and summarization!), and in the course of working on that project I’ve developed some techniques for working with Claude Code that I think have been really effective.
The Process
1. Start with High-Level Vision
Start by writing a high-level description of what I want the app to be, then work with Claude to refine until it’s fully clear - no more questions. Document this in the repo.
For example, in the SATB app, I started with this:
Hey! I had an idea for a webapp. I love to sing, and my range is pretty broad, so I’d like to record myself singing 4 part harmony (SATB). I want to be able to record multiple tracks for each voice, and then to multiplex them all together to listen and re-record certain tracks, adjust the volume of certain tracks relative to the others, and then eventually downmix the tracks into a resulting compressed audio file. I think I can build all this as a single page app that runs in the browser locally, although I might have to use a local webserver to deal with some browser security issues?
The layout I’m thinking for the app is something like this?
[Simple ASCII text drawing of what I was thinking]
What do you think? Is this doable with a local React app?
Claude responded with some questions, I answered them, and also included:
Let’s make a plan and, when we’re aligned, write a design doc for the project first that details our choices.
We eventually wrote this design file.
2. Design Before Code
From there, I apply a general process. For each component:
- Ask Claude to write a detailed technical and product design doc - describing how the component should work, the architecture, how the parts function, key technical decisions with reasoning, and how to handle edge cases
- Review and give detailed feedback (numbered, bullet-pointed!)
- Refine until “good”
- Ask Claude to generate EARS specs for the component
- Create an implementation plan with checkboxes and EARS references that Claude uses during implementation
How I give feedback might be something many folks are unaccustomed to. Here’s an example:
Great! some feedback:
Let’s note that I might have multiple microphones connected, and need to be able to choose among them in the interface.
each (visible) sparkline should show a visual progression of the playhead as well as the playhead moving. This doesn’t have to be complex - whatever’s simplest.
bpm should be adjustable by typing a new value as well as clicking + or - buttons
count-in is brilliant, thank you for catching that!
during recording, I should see a VU indicator showing microphone activity. We can just show that where the sparkline would be for the new track I’m recording.
the overdub record interface is odd.. I think it’d be easier to have a simple toggle switch somewhere in the interface for overdubbing or not. Default is not (and override-mutes all tracks during recording). If enabled, it respects the current mute/solo selections per track.
I find that numbering feedback items, and being thorough and precise helps a lot.
File Organization
All of this goes into docs in the repo. For this SATB project, as it was simple enough, I used the top level design file for the low-level design too. But Threadkeeper has many complex components, so each of those gets a doc (in docs/llds/ in that project).
The EARS specs go into a spec registry. In SATB they got shoved into the implementation file, but in Threadkeeper they’re stored into individual files in docs/specs/.
Then for the implementation plan, in SATB it’s just that one IMPLEMENTATION.md, but in Threadkeeper I have docs/planning/ and also docs/planning/old/ for things that are complete.
I like keeping all this stuff in the repo. it makes it way easier for Claude to find what it needs locally, and Claude can stumble across it during file searches.
3. Mandate TDD with Red-Green-Refactor
This is critical. I put this demand directly into CLAUDE.md:
**Remember:**
- 🧪 Test first, EARS always, trace everything
- 🎯 Test behavior, not implementation
- 📋 **Always update IMPLEMENTATION.md**
- 🔄 Red-Green-Refactor loop is mandatory
Why TDD matters: Tests give you instant feedback when something breaks, force you to think about the API before implementation, and build a regression safety net automatically. With AI assistance, these benefits compound - Claude writes tests faster than I could alone, but I still get all the design clarity and confidence that comes from comprehensive test coverage.
This is how I’ve always preferred to write code (well, after I learned about it). When working without AI, I’d write a spike to figure things out, then delete it and TDD my way to success using a red-green-refactor loop. With Claude, I rarely need those spikes - the AI handles the general knowledge - but I still write them for particularly hairy problems.
4. Use EARS IDs as Context Handles
I ask Claude to label code with EARS spec IDs in comments. For example:
// [MIC-001] Enumerate available microphone devices
async enumerateDevices() {
  const devices = await navigator.mediaDevices.enumerateDevices();
  this.devices = devices.filter(d => d.kind === 'audioinput');
}
This way, as Claude’s context window turns over, the IDs give it easy handles to look up how things should work and tie tests back to functionality back to documentation. It helps the model build up the right context more quickly.
What Makes This Work
A lot of my success with Claude comes from how I review documents in detail and provide very detailed feedback - numbered lists, bullet points, specific technical direction. I iterate on the design documents first and foremost to get that part right.
The investment pays off - once I have a solid low-level design, the implementation just works, even for big, complex components. Most problems I run into aren’t bugs in the code - they’re details that Claude and I didn’t think about in the design phase (like how browsers handle real-time audio processing, or edge cases in state management).
The detailed feedback loop on design docs prevents those issues from becoming expensive rewrites.
Check It Out
I asked Claude to document our complete process in the SATB Recorder README, including the actual prompts I used at each phase. If you’re building with AI, I hope you find it helpful!
The app itself is open source and includes the full design docs, implementation plan, and all 685 tests. Feel free to use it as a template for your own projects.